Thursday, December 15, 2011

Easy Felt Finger Puppets

If you are looking for an easy homemade Christmas gift for kids, these felt finger puppets are perfect!  They are made with scraps of novelty print felt so they literally take 3 minutes to make since all of the features are already there :)

I have made many many finger puppets over the years. Usually they are very time consuming to make. I have made them with teeny tiny felt scraps with embroidered details that take forever to finish!

 My kids love them so I wanted to make more, but was trying to figure out an easier way to make them. I found some really cute fabrics that already had images on them that would be the perfect size for finger puppets.


These are pretty small so they should not be made for any child who is under the age of 3 or chews on toys.

*I used some novelty felt fabric from the fabric store. Sometimes this fabric is called nursery fabric. It is kind of like pajama material. I try to pick out a print that has a decent amount of space between each image. This makes it easier to cut out. You could even use old kids pajamas if you wanted to be super frugal!

You will also need some regular felt for the back of the puppet. One small sheet of felt (cost is about .30) will be enough for quite a few puppets. You can also use felt scraps.


For this project you will need:

1/2 yard of *novelty fabric

1 sheet of felt or felt scraps

Needle and thread or a sewing machine

Scissors or rotary blade with a self healing mat

Choose the image you want. Cut around the image leaving as much space as you can (refer to picture).


Fold over 1/4-1/2 in. of fabric at the bottom of the image. In this puppet I only had enough fabric to fold over 1/4 in. If the hem is too small for you to sew on your machine you can just hand sew it, it doesn't take very long. Sew hem.


Place your image on a piece of felt. Pin the image to the felt. Sew around the image, leaving the bottom open.


Trim the excess fabric from the edges so that both pieces of fabric are the same size.


 Make sure not to cut through where you have sewn. You are finished! How easy it that?! You could have a whole village of these finger puppets in no time! A great homemade stocking stuffer for kids or an easy homemade toy for any occasion :)  Enjoy!

Tuesday, December 13, 2011

White Bean, Kale, and Sausage Soup

I looooove making soup in the winter.  Ok I guess it isn't "officially" winter, but we have had some pretty cold days.  I really miss soup in the summer time.  We don't have a/c so making soup is pretty much out of the question for 4 months or so. 

I really try and make up for that as soon as possible.  Soup is cheap, usually easy to make, and I have found that it is harder to mess up then other recipes I tinker with.

You can really just use what you have on hand.  For example, we still have a decent amount of kale in the garden right now.  I am not a big cooked greens eater, but I do enjoy kale slightly cooked.  I prefer to add the kale right before I eat my soup.  It only takes a few seconds for the kale to cook slightly in hot soup.

Below is my recipe for White Bean, Kale, and Sausage Soup.  You can use any kind of sausage you like.  You can also use any kind of beans.  Pinto beans would be really good in the soup or even lentils (which don't require soaking and can be added 30-45 minutes before you eat, making for a really quick to make soup).  Greens like collards, turnip greens, or chard can be used.  These are all very inexpensive as well.


White Bean, Kale, and Sausage Soup

1 cup dry white beans
4 cups chopped kale (washed and stems removed)
1/2 lb. turkey sausage
1 medium onion
6 cups chicken stock
3 Tbsp vegetable oil

You can either do the quick soak method or the long soak which are both on the back of the bag of beans.  I do a brine/quick soak method I learned from Americas Test Kitchen which yields less mushy, flavorful beans.  Put your beans in a pan and cover with cold water (about 2 inches over) and, for this recipe, I add about 1/4 tsp. salt.  Generally you use 2 tsp. per quart of water.  Boil for about 5 minutes and let stand for at least an house.  Drain and rinse your beans.  Continue with recipe as follows. 

In a medium stockpot, add the oil and brown the sausage over medium high heat.  Turn the heat down to low and slowly add the stock.  Take a wooden spoon and scrape the bottom of the pan, so you can
get all of the brown bits into the soup.  Add the onion and beans. 

If you used the method on the bag of beans, cook until beans are tender.  This usually takes 1-2 hours.  If you do the bean brine method, cook the coup for about 40 minutes or until beans are tender.

You can either add the kale to the pot 5 minutes or so before serving, or dish out individual bowls 5 minutes before serving and add the kale that way.  I prefer adding it to the bowls, that way if I have any leftovers, the kale doesn't get too overdone.

A slice of hearty homemade bread is a great accompaniment to the soup.  I also like to garnish with a bit of Parmesan cheese.  Enjoy!

Monday, December 12, 2011

Simple Tooth Fairy Pillow

Here is a very simple tooth fairy pillow I made for Christmas. These will make great stocking stuffers for the kiddos :)  I wrote down some simple instructions on how to do it...


I used an old cotton shirt and some eco fi felt.  I just simply drew a tooth on a piece of cardboard that was about 3 inches tall and cut it out.  I used that as my template and cut out two teeth from the felt.  I also cut out little initials which are optional.  I then cut 2, 10.5" by 5.5" strips of cloth. 

If you want the initials on your teeth just sew them on first.  I then sewed a tooth about 1" from the bottom of each strip of cloth, making sure to have it placed in the center.  I used a medium width, short length zig zag stitch to stitch it, leaving the top of the tooth open. 

I folded the pillow in half length wise so the side with the tooth or the "right" side was on the inside.  I straight stitched around the pillow leaving a 2" space to turn the pillow.  I cut the excess fabric at the corners and turned the pillows, pushing the corners out with a crochet hook.  I stuffed it lightly as I wanted it to be soft.  I then sewed the 2" opening shut.

It was pretty easy and a very cheap handmade Christmas gift idea :)  Enjoy!

Wednesday, December 7, 2011

Simple Peanut Butter Cookies Recipe

I love to bake around the holidays but I try to do it without spending too much extra money.  This simple from scratch peanut butter cookie recipe is a very frugal cookie recipe.  I use it to make regular peanut butter cookies and also peanut butter blossoms (the peanut butter cookies with the Hershey Kisses smooshed in the middle).  They make a great homemade Christmas gift or treat to bring to a party.


I like to use this recipe to make my peanut butter blossom cookies because it cuts the costs down a bit since I don't have to use a cookie mix.  I counted 75 kisses in the bag and each batch of this makes about 2 doz. cookies (depending on how big you make them) so you can easily make up to 6 doz. cookies with each bag of 12 oz. kisses, you just have to triple the recipe to make 6 doz.  2 doz. is a great amount to give as a gift, so if you package them in a tin (from the thrift store of course ;) !) you have 3 gifts costing less then $2.00 each!

The following recipe instructions are for making the peanut butter blossoms, but if you want to make plain old, from scratch, peanut butter cookies just roll the each ball of dough in a plate covered in white sugar, place on the pan and press down with a fork once in each direction.

Simple and frugal from scratch peanut butter cookies:

Preheat oven to 350 degrees.

Ingredients:

1 cup smooth peanut butter

1 cup white sugar

1 large egg

1/4 cup white flour

*optional 12 oz. bag of Hershey kisses, 24 unwrapped if you are making peanut butter blossoms.

*optional 1/4 cup white sugar on a plate if you are making just plain peanut butter cookies.

Combine all ingredients in a mixer and mix until combined.  How many cookies you get depends on how big of a ball of dough you use.  I made mine about an inch wide.  You could probably use a little less than a tablespoon of dough for each cookie.  If you want to make regular peanut butter cookies follow the instructions above the recipe. 

If you are making peanut butter blossoms place cookies one inch apart on a baking sheet.  Now it must be said that times for cookies vary for everyone.  It depends on the pan you use, the actual temperature of your oven, etc.  These can take anywhere from 10-14 minutes.  Just carefully lift one up with a spatula.  It should be golden brown on the bottom.

Take the cookies out of the oven and quickly place them on a cooling rack.  They will be pretty soft so it is best to use a small spatula and a fork or spoon to help slide them on.  Press a kiss into the middle of each cookie.  Let them cool completely and store in an airtight container.  Enjoy!

Tuesday, December 6, 2011

Cheap Handmade Christmas Gifts

Here are some great tutorial on the web for making some cheap homemade Christmas gifts.


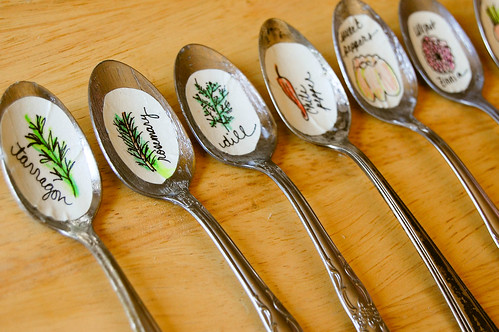
For the gardener...plant markers from old Spoons via Domestic Simplicity.


For little girls...dollhouse made from an old drawer via Nice Girl Notes.


For the ladies in your life...a recycled t-shirt scarf from Vermilion Rules.

Melted Vinyl Bowl Record

Homemade present for a man!  Yes it exists :)  Old records are super cheap at The Goodwill or any thrift store.  Melted vinyl record bowl via The Paper Seed.


Present for anyone 21 or over.  Maybe a little more expensive then the rest, but how cool is this...Homemade Kahlua and Butterscotch Liqueur via Wee Folk Art.


For the boys...felt campfire via Simply Frugal Homemaking (hey that's me!!).


For the seamstress...sewing kit in a jar via Frugalicious Me.


For the crafter...homemade stamps via The Sweet Occasion.

Have you stumbled upon any great frugal handmade Christmas gift ideas?  Please share by leaving a comment below :)

Monday, December 5, 2011

Homemade Laundry Detergent Recipe

Someone I worked with told me how she made her own homemade laundry detergent. This idea immediately appealed to me as I was sick of all the packaging from the laundry soap I was buying. I also was spending $10 a week since I had cloth diapers to wash and at least a load of baby clothes every other day.


I adjusted the original recipe a bit to suit my families needs and you can do the same! You can do the same, just test a new batch out on some old towels. These ingredients are available at the grocery store just a block from my house. Just check the laundry soap aisle, if you can't find it, ask a manager. They may even start carrying it! You can also buy any of these ingredients on the Internet.

Homemade Laundry Soap Recipe:

1 Cup Borax
1 Cup Washing Soda
1/2 bar Fels Naptha (grated)
A couple drops of your essential oil of choice (optional)

Mix the ingredients. Store in a plastic container. Use 1-2 Tbsp per load. Example: I use 1 Tbsp on my clothes, 2 Tbsp on cloth diapers. Try it out on a load of old towels, to make sure you like it. It is really that easy!

Ideas for making homemade laundry soap a homemade Christmas or anytime gift:


A jar of homemade laundry soap would make a great gift.  For Christmas you could add peppermint essential oil, and put in a jar (any jar really).  Just paint the lid with some spray paint if you are using an old jar with the label on the lid, or you can use a mason jar with a two piece lid.  You could also add a bit of fabric in between the lid pieces. 

A set of clothespins mod podged with some scrap book paper would be a great accompaniment to this gift!

Make sure to include instructions for how to use the laundry soap as well.  I chose to write in permanent marker on the lid so there would be no confusion about the contents of the jar later if the tag falls off.  If you want to dress up the top of your mason jar lid, head over to According to Kelly for these super cute free printable mason jar Christmas labels (whoa that's a mouth full!).

printable_Christmas_labels

Basic Wheat Bread Recipe

Baking my own homemade bread was something I didn't do too much of until recently.  My local grocery store sells a loaf of their store brand bread for around a $1.50 so I didn't see much point.  I have been trying to eliminate the amount of preservatives and gross chemicals that my family eats and the ingredients on this store brand bread were a little terrifying!  Let's face it, from scratch recipes are almost always better :)


I rounded up all of the costs and figured the ingredients for my bread cost around .80 for 2 small loves that equal the size of the store bought loaf.  I also know my furnace runs less on days I bake, and I make it a point to do all my bakingon one day.  This keeps the oven from having to run as much, plus it is just easier for me to do it all in one day.  In the winter I assume the costs of running the oven is covered by the fact my furnace does not have to run as much. I think my bread has a much better taste then the store brand, and has a lot less ingredients (to me this is a big plus!).My loaf is more comparable to the fancy loaves of bread that they sell in the bakery for $4.00.  It may be just me, but I like the idea that I am the only one who has handled the food my family and I are eating.  All these pros were enough for me to switch to making homemade bread.  Let's face it, from scratch recipes are almost always better :)

This basic homemade wheat bread recipe has few ingredients which makes it a really simple wheat bread recipe.  I find a mixture of white flour and wheat flour is best but you can change the ratios however you want. 


Simple and Basic Wheat Bread Recipe

 2 c warm water (not hot, just warm to the touch)
2 Tbsp Instant yeast or 1 packet of active dry yeast (if using active dry, let yeast, water, and honey proof or sit for 5-8 minutes or until it has a foamy bubbly top)
1 Tbsp honey (optional)
pinch of salt
4-5 cups of a mixture of flours, we use 2 cups self rising flour or all purpose flour (sift with 1 tsp baking soda a pinch of salt), 1 1/2 c whole wheat flour, and a 1/2 c wheat bran.  You can mix and match these to your tastes.  I have also used 1/2 c quick oats instead of wheat bran.


Mixing and Kneading

Put the warm water, honey, and yeast in a bowl.  Oil a large bowl, making sure all of the sides are covered.  You only need about a Tbsp of cooking oil. Mix the flour into the yeast mixture.  You can use a large spoon, but I just use my hand ;).  Sprinkle 1/2 c of white flour onto a clean work surface.  Place dough on work surface, fold dough in half and press down with the heel of your hand.  1/4 turn the dough, fold, and press down again. 

Repeat this process until the flour is incorporated fully.  The process of turning and pressing the dough is meant to build up the gluten.  If you press the dough and it springs back slightly, it is good to go.  If not repeat the process a couple more times.


Letting the Dough Rise

Put your dough into the oiled bowl and turn to coat the entire thing.  You need to let your dough rise in a warm spot. We use our oven, placing the dough on the middle rack, and placing a pan full of boiling water on the rack below.  I am sure you know to be very very careful with your pan of boiling water.  This works the best for us, especially in the winter when the house is usually too cool for dough to rise well.  Let the dough rise until doubled in size. 

While you are waiting clean off the work surface you used to knead the dough. Now you can either bake the bread in 2 small pans or 1 large pan.  Either way, if you have a glass pan, spread butter all over the bottom and sides of the pan, then brush flour over all buttered surfaces.  This will keep the bread from sticking when it is done.

Once the dough has risen, punch it down, form it into either 2 dough balls for 2 small bread pans, or 1 large dough ball for 1 large bread pan.  I sometimes roll them in cornmeal before I put them in the pan, but this is optional. 

Cover your loaves of bread and let them rise in a warm area until doubled in size.  This will take about an hour so set your timer for 45 minutes, and preheat your oven to 350 at the end of the 45 minutes.  This should give your oven enough time to get to temperature.

Baking the Bread

When the dough has doubled and the oven is fully heated, place the loaves or loaf in the oven on the middle rack. If you have baked 2 loaves I find 30 minutes to be fine.  If you want a crunchier crust you can do 35 or 40.  For a large loaf I do 50-60. 

It is important to realize every one's oven is different, so check your loaf.  If you knock on it and it sounds hollow, and it has a nice golden color it is probably done.  You may have to experiment.  If you make this bread often you will get into a nice rhythm and all of your loaves should turn out great :)  Enjoy!


Wednesday, November 30, 2011

Make Your Own Household Cleaners.

Making your own household cleaners is a great way to save some money.  Although I love saving money I also love things that are good for the Earth too.  It is great how often these two go hand in hand!!  I also have an old house with old sinks, bath tubs, toilets etc. that just seem to get dirtier a lot easier.  It is really important for me to have some homemade household clearners that actually work!
Since my goal is to meet both criteria, I chose ingredients that not only clean well, but are as "green" as possible.  You really only need a few to clean almost everything in your house.  It is awesome!  My favorite "base" cleaners are vinegar, baking soda, borax, and fels naptha.  I also use lavender as my essential oil of choice.  Alright enough yakking, lets learn how to make your own household cleaners :)


Make sure to follow all instructions on the boxes of the products below.  Products such as Borax, although a naturally mined resource, are considered toxic and should be kept away from small children.  Read all safety information on the boxes of all of these products.

--------------------------------------------------------------------------------
Windows: I keep a spray bottle with just vinegar that I use for windows and mirrors. I find newspapers or cloth towels work very well. Spray on and wipe until vinegar is completely gone.
--------------------------------------------------------------------------------
Shower: First sprinkle baking soda all over the tub.  Then put white vinegar in a spray bottle and completely cover the baking soda.  Let this sit for a minute to break down any soap scum. Use a scrub brush and scrub like crazy.  Let this sit for 15-20 minutes.  Go back and rinse out the tub.  Scrub the surface one more time (you don't have to go crazy this time) and rinse again.

It can be tricky to clean the sides of the shower.  I just take a bar of Fels Naptha and rub it on the walls of the shower.  I then scrub and rinse off.
--------------------------------------------------------------------------------
Stained coffee cups: Put 1 tsp of baking soda and about 2 Tbsp vinegar in cup. Swish foamy mixture around cup and let sit a few minutes. You can empty the contents into the sink or garbage disposal which will help with odors. Wipe down inside of cup with a towel and rinse. The stains come off very easily. This method is much better for you than harsh bleach.
--------------------------------------------------------------------------------
Stains around drain: Dump a little hydrogen peroxide directly on the stain. Let sit for a minute, then scrub with an old toothbrush. Seriously this stuff starts breaking the gunk up right away.  It is awesome!
--------------------------------------------------------------------------------
Mildew: Never mix vinegar and hyrdogen peroxide. It is a dangerouse combination. You can use EITHER vinegar OR hydrogen peroxide on mildew in your shower. Just spray the contents directly on the mildew and let sit for a few minutes. Scrub with an old toothbrush and rinse spot.
--------------------------------------------------------------------------------
Clean coffee makers: Use 1/4 C vinegar and fill the water resevoir full with water. Run through coffee maker. Run through again with just water. You should be able to easily wipe off any coffee from the coffee pot after you are finished. You can run water through a third time to ensure there is no vinegar left.
--------------------------------------------------------------------------------
Cleaning floors: Mix 1/2 C vinegar with 5 or 6 drops essential oil of your choice and hot water.
--------------------------------------------------------------------------------
Toilet cleaner: Pour about 1/2 C vinegar and shake a little baking soda in the toilet. Let sit for a few minutes and scrub clean. You can mix a few drops of essential oil if you like.
--------------------------------------------------------------------------------
Cleaning the fridge: Empty your fridge, and spray a mixture of 1/2 vinegar and 1/2 hot water. Scrub your fridge and wipe clean with a dry towel. Place a box of baking soda in the back of your fridge to help deodorize.
--------------------------------
All purpose cleaner: In a spray bottle but 1/4 C. white vinegar, 1 teaspoon Borax, and about 5 or 6 drops of essential oil.
-----------------------------------
Check out my post on my homemade laundry detergent recipe and learn how to make your own!

I am continually experimenting so please check back for more additions :)

Homemade Shampoo Ideas

Recently I decided I wanted to try and make my own homemade shampoo. Regular shampoo is filled with all sorts of nasty stuff that is bad for you and the environment.


Why is it bad for your hair? First it strips your hair of all of its natural oils. I have always had to use a lot of conditioner to balance this out. Also, shampoo is filled with yucky stuff that gets absorbed into your skin, since skin is very porous. The chemicals used in shampoo and other household products pollute our water, killing fish and other wildlife.

So what are your best options for homemade shampoo ideas? Since every one's hair is different, it is best to try out a couple of ways and see which one works best for you. Some of these processes take a couple of weeks for your hair to regulate back to its natural state.

Remember to always use caution when trying a new homemade shampoo. Although most of the ingredients recommended are natural, you could still have an allergic reaction. Never use on babies or children without consulting their doctors. Also remember that pets will lick their fur after you wash them, so it is best not to use homemade shampoos on them.

My personal favorite (and the cheapest option!) is a mixture of baking soda and vinegar. Yeah I know it sounds weird but it really works! Well for me it does. It is very simple. Simply mix a tablespoon or two of baking soda with warm water. Pour over the top of your head, and gently rub into your scalp. You don't have to worry so much about the ends of your hair, just concentrate on your scalp. Rinse your hair well. I do this twice, as it seems to keep my hair from being oily.

Next fill a spray bottle with equal parts apple cider vinegar, and water. Spray the ends of your hair. Let the vinegar sit in your hair for about a minute, then rinse. Don't worry, the vinegar smell will go away after your rinse your hair. You may need to experiment to find out how much baking soda and vinegar your hair will need.

I find that my hair is very easy to brush after I wash it using this method. If your hair is very tangled after doing this, you could use a little No More Tears by Johnson and Johnson. It will help detangle your hair. Just a tiny bit on the ends of your hair should do the trick. Some people use olive oil or jojoba oil, but I would start with a very small amount on the ends of your hair.

If you have been using regular shampoo your whole life, it may take up to 6 weeks for your hair to regulate. Trust me though, it is worth it! Your scalp just needs time to regulate the amount of oil it produces. Since it is used to being stripped of natural oil, it may over compensate for awhile. You might get lucky like me and my husband did, and have it work right away. This combination can also help people who suffer from dandruff.

You can also either grow soap wort or buy it dried online or at a health food store. Soap wort is a small flowering shrub that contains a natural detergent. When dried soap wort leaves or stems are boiled, it will create a wonderful rinse that can be used as shampoo.  Here is a recipe for soap wort shampoo. 

Another option is to make your own homemade shampoo using castile soap. Just use equal parts castile soap (which can be found on Amazon or at most health food stores), and water. You will also want to add a tablespoon or so of jojoba oil, grape seed oil, or olive oil. You may need to play around with the amount of oil you use. If you buy your soap in bulk, this will save you money and packaging. The mixture lasts for about a week, so only make as much as you use in a week.

If you don't really want to make your own soap, or if baking soda doesn't work for your hair, you can buy bar soap made especially for hair. Etsy has some shops that offer this. Just search for "bar shampoo" and you will find many options. Although it may not be the cheapest option, when you consider the health and environmental benefits, it is worth it!  Check with the shop owners to see if they give discounts for buying the bars in bulk.  You can also make your own shampoo bar soap with this recipe.

Enjoy!!

Felt Campfire Tutorial


This tutorial has moved to here!

Baking ingredients you can make yourself and save money!

With the holidays here my baking is increased a lot.  I don't generally make sweets during the rest of the year, but I love making them at Christmas time.  It is only once a year after all! 

It is frustrating to me when I go to make a recipe but I don't have something like, buttermilk for example, on hand.  It is also silly for me to buy something like buttermilk when none of us drink it, and most recipes only call for a small amount.  I just hate to waste the money throwing it out!  Over the years I have found easy and cheap ways to make these ingredients at home. 


Brown Sugar

Brown sugar is usually more expensive than sugar, but the great thing is you can make it yourself at home for less! All you need is two ingredients; brown sugar, and molasses! Just combine 1 C sugar with 1 Tbsp. molasses and mix together with fork, making sure to get out all of the clumps. If you need it darker just add another Tbsp. of molasses. Molasses can be stored in a cool dry place after being opened for about a year. Just make sure the lid is on tight and that you wipe down the rim after each use.

Self Rising Flour

If you have a recipe that uses self rising flour you can substitute it by adding 1 tsp. baking powder and 1/2 tsp. of salt to every 1 cup of flour. Sift the ingredients together to evenly distribute the salt and baking powder.

Cake Flour

Cake flour is a starchy flour used in making cakes and cookies. The bad thing about it is it's expensive! The good thing is you can easily make it yourself! Just take 3/4 C flour and sift it with 2 Tbsp. cornstarch. That is it!

Buttermilk

Buttermilk is a great baking product to have. It will make baked goods nice and fluffy, but really how often do you need it? Usually you have leftovers so unless you like to drink buttermilk it is best to make your own. All you need is milk and some kind of acid. I usually mix 1 C milk with 1 Tbsp. apple cider vinegar (white works fine too) and let it sit for 5 minutes. You will see the milk thicken and start to curdle. You can also use 1 Tbsp. lemon juice instead of vinegar.

Sweetened Condensed Milk

Condensed milk is used in a lot of dessert recipes and candy recipes. It is also pretty expensive but easy to make on your own. Just mix 3/4 C sugar, 1/2 C water, and 1 C powdered milk in a pot. Turn the heat on high and bring it to a boil. Turn heat down to medium and stir until thickened. This takes about 15-20 minutes but it is a good workout for your arms!

Evaporated Milk

Evaporated milk is simply milk that has has most of its water content taken out.  Just combine 1/2 c non-fat dry milk with 3/4 c water.  That is it!

Welcome to Simple Frugal Homemaking!

Welcome to Simply Frugal Homemaking!  My name is Leslie and I am a voluntary stay at home mom. To me homemaking is a wonderfully fulfilling way to spend my days!  Although I am not an expert, I hope to share some of my best frugal living and simple homemaking experiences with you.  I will be filling this blog with frugal living tips, simple homemaking ideas, recipes, do it yourself handmade crafts, and all sorts of fun stuff! 

More and more families are turning their minds and hearts back to their homes.  I know personally I became fed up with the rat race.  I wanted to stay home and create a warm, loving, and safe place for my husband and children.  I find so much satisfaction in making things myself and living frugally.  There is a common misconception that people who live frugally do so because they have to.  I am lucky enough to say that is not the case for me and my family!  If that is the case for you, I hope that this blog will help you to see there is much to love about simple homemaking!

I want this to be a place where people from all walks of life who are interesting in homemaking and frugal living can get support, ideas, and encouragement.  I hope you enjoy this blog as much as I do!